Showing posts with label Candles. Show all posts

Craft an Easter Candle with Kids

Making an Easter candle (also known as a Paschal Candle) to use at home can be a great religious Easter tradition for your family! The ones we made were made were super easy to do, and I used candles from the Dollar Tree, so this project seriously only cost us $1.


These are so much easier to make than it first appears! 

  1. Scratch your design onto the candle with a dull pencil.
  2. Let you kids paint on it however they see fit.
  3. Wipe the candle with a baby wipe.
  4. Your design is complete! :-)
Easter candles can have all kinds of symbols. It seems they mostly commonly have a cross with the year written around it. We also have a Paschal lamb on the back of ours. Some other things you could try would be an alpha and omega, wheat and grapes... all kinds of stuff really!
 

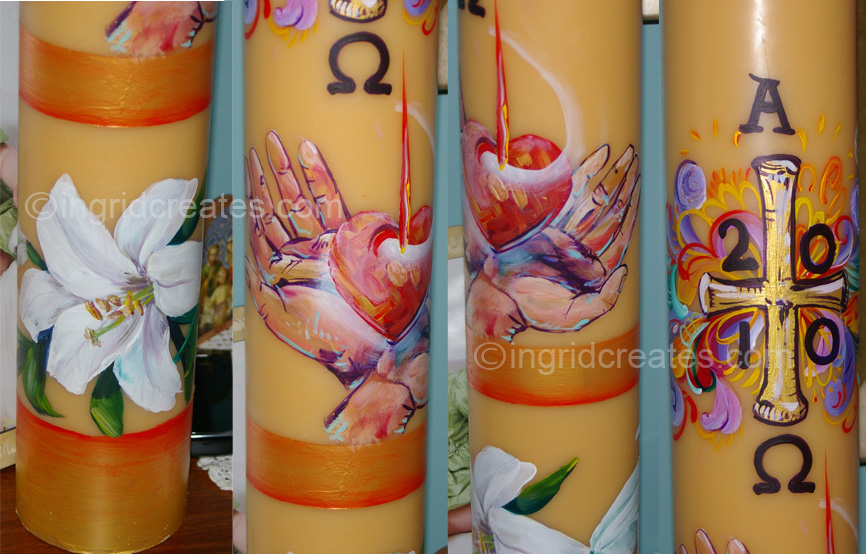
Also, poke some holes in each end of the cross and one in the middle to insert cloves. I actually had real cloves this year, but last year I didn't so we just stuck in some grains of brown rice. The cloves are inserted like nails, and there are 5 of them to represent the 5 wounds of Christ.


I actually love the color variation this painting technique creates!

I was trying to come up with a religious Easter craft to use with my preschool class, and thought that making Paschal candles would be perfect! It went even better than I thought it would! I scratched the design into their candles ahead of time, poked the holes for the cloves, and they took it from there. (We used washable tempera paints).


 Didn't they come out nice? The kids in my class
are only 2 years old!

When to light your Easter Candle at home:
The Catholic church lights the Paschal candle through the whole season of Easter (so from Easter Sunday through Pentecost Sunday), and also at baptisms and funerals. We plan on lighting ours at dinner each night during the Easter season.- all 50 days! :-)

Don't Miss a Chance to Teach your Kids!
After making your Easter candle, take it to mass and have the priest bless it for you! Also, take them to the front of the church and show them the really big Easter candle there. Easter is almost here! :-)

Related Posts:


If you enjoyed this post, get free updates by email or RSS. Photobucket

Designing a Paschal Candle- by Guest Blogger Ingrid Lee

Easter for me is a time of reflection, it's a really special time and place where I can go within myself and make that connection to God within and truly explore the spirit of Lent and Easter. I usually do the flower arranging in our Church at St Jude's Parish for Holy Thursday, using the white roses and other Australian Native flowers around the parish, which I really enjoy. But last year I was really honored when I was asked to paint the Paschal candle.

Here was the design I made for last year's Paschal candle:


How I painted the candle:
I didn't seal the candle, or mix the paint with candle medium, I just painted straight onto the candle with acrylic paints. I used a stylus tool to freehand draw or inscribe the design into the wax, so that I could see the designs. I under painted everything in gold paint to create a rich colour that would show through the layers of paint. The style of artwork on the hands was more graphic so that you could see the details of the hands from the back of the church (of course I wanted everyone to see it!!).

What does the artwork mean?
The overall idea of the candle was to express of all Easter's significance for me in the limited area of work of a pillar candle! This was certainly a challenge because of the limited workspace! All of the detail work in the painting was completed in purple, a significant colour of Easter.

At the very top of the candle I'd painted the verse "We Lift up our Hearts, " which pretty much summed up the meaning of the artwork...while we accept the bread of Christ, we offer our hearts and consciousness to Christ during this time of Lent, right through to the celebration of Easter Sunday.

The base of the painted candle was completed with the Easter flower of white Lilies, the hands are offering the sacred heart,and the cross symbolising Easter 2010, represents the joy and celebration of Easter.


This was certainly an enjoyable and fulfilling artwork for me to complete. I've really enjoyed sharing this artwork with you, and hopefully it may inspire you to express your meaning of Easter on your own candles for your centre pieces or paschal candle at home or church.

Ingrid Lee is an artist, writer and educator about finding and exploring everyday creativity through art, porcelain painting, baking, embroidery and sharing the artworks of other inspiring people. Join her creative and inspiring adventures at Ingrid Creates.
If you enjoyed this post, get free updates by email or RSS. Photobucket

Candlemas Activity and Craft

I wrote this post for Candlemas last year, but most of you weren't readers back then and I really liked this idea, so I thought I'd run it again. You can also check out my post from last year on ideas for celebrating Candlemas here, and my roundup of candle crafts and food ideas here. St. Blaise's feast day is also coming up on February 3, so these candle crafts will be useful for him as well! :-)

Candlemas is coming up on February 2, which is the feast of the presentation of Jesus in the temple, and the traditional end of the Christmas season. Among many things, this a a traditional day to bring your candles in to be blessed and to light candles in your home. There is often a procession into mass with candles as well. Click here to read more about Candlemas.

This is a craft I came up with where you make faux candles out of rolls of change, then you take them to mass on Candlemas to put into the collection basket! :-)

Completed Project

What you'll need:
  • Rolled Change
  • Paper (white, yellow, and orange)
  • Decorative Paper (optional)
  • Glue Stick
  • Scissors

Start by rolling some change. This can be a good math
activity for elementary aged children!


Cut your paper a little longer than the tube of
rolled change, attach with a glue stick.
Allow the extra length to overhang the top.


Fold down the top to close the same
way you did with the top of the change roller.


Cut teardrop shaped flames from yellow paper, leaving
a tab at the bottom. Embellish with a football shaped
piece of orange paper and attach with a glue stick.


Fold the tab backwards and use it to attach the
flame to the candle with glue.


If you use white paper, your kids can decorate the candles with markers or stickers. Voila! Your "candles" are ready for the collection basket! :-)

If you enjoyed this post, get free updates by email or RSS. Photobucket

This Little Light of Mine Craft

Catholic ABC's Week: 17
Letter of the week: L
Theme: Light (This Little Light of Mine)
Saint of the Week: St. Lucy (and btw, Lucy means "light")
Craft: This Little Light of Mine


Supplies needed to complete this craft: (All of these supplies are available at the Dollar Tree)
  • Disposable Punch Cups
  • Plastic Tea Lights (or real tea lights)
  • Assorted colors of tissue paper
  • Glue
  • Paint Brush
I got our plastic punch cups at the Dollar Tree- 12 for $1. The kids in my preschool co-op class are only 2, so I thought this would be best. If you're working with older kids, you could actually do this craft with something glass (also from the Dollar Tree). 

Also because my kids are 2, I went with fake tea lights. These I also got at the Dollar Tree, 2/$1. I later saw them in a different section of the store 3/$1. They come with batteries and everything!


Start by cutting the tissue paper into little squares. Just fold it up a bunch of times before you start cutting and you will be able to cut like, a million squares at a time. I usually limit the color pallet for my kids when they do crafts. I gave them only yellow, lime green, and pink tissue paper. You can achieve orange by layering.


Mix your glue to be about 2 parts glue one part water- just eyeball it. I mixed it in the extra punch cups. Then stir until mixed. Have each kid turn their cup upside down on the table, and paint the outside with the glue mixture. Stick the tissue paper on as you go. Encourage overlapping for experimentation with color. If they have the patience, also paint over the outside of the tissue paper with the glue to make it smooth. This technique is called decoupaging.


When the glue is dry, put the candle inside and let your light shine! The effect of the candle behind the tissue paper will be similar to stained glass. Here's how it will look in the dark:


Be sure to sing "This Little Light of Mine" and act out 'hiding it under a bushel' with the kids. They will love it!

Grab Bag Ideas for the Letter L: (be sure to check out the Classroom Script for directions on using the grab bag.) Lizard, Lilac, Lion, Lamb, Lollipop, Lipstick, Locomotive, Lotion, St. Lucy Holy Card.

For More Resources, check out the Catholic Toolbox lesson plans for the Letter L. (Her L lesson is on Loaves and Fish.)

Catholic ABC's runs here at Catholic Icing every Wednesday with the new letter of the week. You can get the details of this program by checking out the Classroom Script.


If you enjoyed this post, get free updates by email or RSS. Photobucket

Religious Christmas Dinner Ideas

Looking for a way to Keep Christ in Christmas as you serve your roast beast? Well, here are a few cute ideas I have found on the internet.

Cleverly share a Reading of the Christmas Story with your
dinner guests- check this out on Inspiring Ideas

Jeanne from Inspiring Ideas also prompts us to remember our true
guest of honor at our dinner table this Christmas.

Cut Out and Keep has directions on how to make
Baby Jesus Buns as your dinner rolls.

For your centerpiece, use your advent wreath, but add a white 
Christ Candle to the middle. You can make this as easy or as hard 
as you'd like, from a plain white candle to a very decorated one.
Keep using your Christ Candle through the entire Christmas season.

I absolutely love these Nativity Candles from My Little Flower!
I'm hoping to decorate our Christ Candle using this technique!

I almost forgot! Be sure to Make Jesus a Birthday Cake
for your dessert! This one is from Jeanne at Inspired Ideas.
Click here to see a round up of Happy Birthday Jesus
cakes that I put together last year.

I'm hoping to use all these ideas at our Christmas dinner table, but we'll see what I have time for! ;-) We're definitely having at least a plain white Christ candle, and I'm really going to try to include the reading of the Christmas story! Also, the birthday cake is s must for us. ;-)

If you enjoyed this post, get free updates by email or RSS. Photobucket

Celebrating St. Lucy's Feast Day for Beginners

On St. Lucy day (also know as St. Lucia Day) is just around the corner on December 13! On this day, it's a big tradition for the oldest girl in the family to dress in a white garment with a red sash (symbolizing martyrdom) with a St. Lucy crown on her head. She wakes up early and brings her family members sweet rolls (or 'Lucia buns') to their bed. Traditionally, this would be saffron bread (find the recipe here) but other sweet breads can be substituted.


My daughter is only 4, so we staged her bringing some rolls upstairs to my 2 year old (pretending to be asleep in bed). Lydia wore her flower girl dress from a wedding last Summer, and I tied a red ribbon around her waist. It's traditional to wear a red sash, but we didn't have one.  


We all know I'm not a cook, so in place of the saffron bread, we made out-of-the-can cinnamon rolls. It seems that an "S" shape is traditional, so I re-shaped the cinnamon rolls. A lot of St. Lucy bread seems to be garnished with dried cranberries, dates, or almonds- I was going to use raisins, but we were out.


It is said that St. Lucy wore a wreath on her head with candles in it to light the way as she brought food to the poor. We made our St. Lucy crown from construction paper- I didn't want real fire on Lydia's head. Lol! I cut strips from green paper and taped them in a loop the size of her head. We taped on white rectangles for the candles, and I twisted pieces of yellow tissue paper for the "flames". I had some extra greenery leftover from our advent wreath craft, so I hot-glued some leaves on. We made the whole crown while our bread was baking.


It's also traditional to make your sweet bread in the shape of a braided wreath and put candles in it. Again, I braided straight-from-the-can cinnamon rolls and formed them into a circle.


After baking, I drizzled it with the icing and inserted white birthday candles. Yay for easy St. Lucy bread! (I made this wreath and the two sweet rolls all from just one can of cinnamon rolls.)


After lighting the candles, I wasn't sure what we were supposed to do. Since St. Lucy is the patroness of the blind, we said a prayer for St. Lucy to open the eyes of the spiritually blind. Then we sang "Happy St. Lucy Day to You..." and blew out the candles. This seemed like the logical thing to do to me! ;-)

More St. Lucy Resources:

Paper Dali has a free printable

I would love to have a children's book about this 
day, like Lucia, Saint of Light. I've read great 
Catholic reviews about this book!
Lucia, Saint of Light

This is such a great way to have fun with your kids and teach them about St. Lucy! We're going to make celebrating St. Lucy day an annual tradition at our home!

If you enjoyed this post, get free updates by email or RSS. Photobucket

DIY Paschal Candle for Home

I've never had a Paschal Candle for my home, but I plan on crafting some with my daughter and little brother this year! Read more about Paschal Candles in the home over on Catholic Culture.

Our Domestic Church shares an excellent post on

Homeschool Goodies has a super easy Paschal Candle idea
and shares the link to the printable so you can do it too!
See her completed Paschal Candle here :-)

Catechist's Journey has a great post on Paschal Candles
that includes discussion topics and history for kids.

I look forward to trying this! Have fun crafting!

If you enjoyed this post, get free updates by email or RSS. Photobucket

DIY Candle Stations of the Cross

I absolutely love stations of the cross that are candles. The idea is that after each station, you extinguish the coordinating candle. This way, at the end, the room is dark and somber. 

This amazing idea for votive stations of the cross originally
came from Just Another Day in Paradise. She includes
directions on how to make them yourself, and a link to the
free printable stations she used! :-)
 

 Ten Kids and a Dog did the same project, but 
first they made their votives purple for lent!

 I also found this stations of the cross project on
Homeschool Goodies. It really turns out beautiful every time!

And as long as you have out your glue and tissue paper, 
from Hang on Baby Jesus. This is Gonna Get Bumpy.

Hope you guys are enjoying all the Stations of the Cross ideas! More to come :-)

If you enjoyed this post, get free updates by email or RSS. Photobucket