Showing posts with label Spring. Show all posts

Make a Mini Mary Garden with Kids

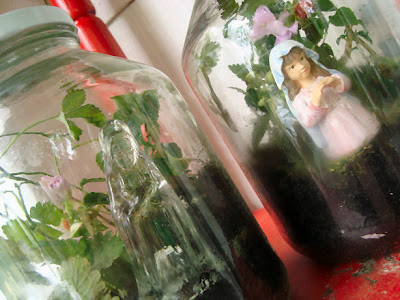
This week the kids and I made some Mary garden terrariums! Not only was this super fun, but it opens the door to discussing evaporation, plants, roots, and honoring Mary.


I want to start out by saying that I'm not a garden expert, nor am I an expert on terrarium making. I read all about making terrariums with kids here, and it had a lot of great information! For all I know you're going to tell me that I let my kids plant poison ivy in their terrariums (although I certainly hope not).


We made our terrariums using apple sauce jars because, well... my kids eat tons of apple sauce. Pickle jars would have been better because they have a wider mouth for arranging the plants. My kids could fit their hands into the jars, but I couldn't. I was able to use a stick to help arrange things.


We put some potting soil in the bottom, and planted some inpatients. I'm sure the inpatients weren't the best choice because they grow too big, but I had them on hand so that's what we used.

Then we walked around the yard and I let them select some other things for their terrariums- plants, rocks, whatever. I think you could even add some bugs if you wanted.


We also added some moss.

The moss was great because it can go in front of your Mary statue without being tall and covering her up.

We used Mary statues from old nativity sets- you know- the ones you don't set out at Christmas anymore because you have so many, but don't get rid of because, well, who gets rid of nativity sets? You can piece out old St. Joseph statues for mini St. Joseph altars, too. :-)


I actually had some trouble finding Mary statues that were skinny enough to fit into the narrow jar openings, so make sure you test your Mary statue before you begin. My kids were able to help me place my Mary statue in my jar since my hand didn't fit. It was nice for them to get to help me for a change! ;-)


Once you're all finished, water your mini Mary garden and put on the lid! Terrariums are great because they water themselves! This is a huge plus to me, because I do NOT have a green thumb. Remembering to water house plants around here is just never going to happen. Look how happy Lydia is with her mini Mary garden!


By the way, these terrariums are the most challenging craft I have ever had to photograph for this blog!


We are proudly displaying our mini Mary gardens on a shelf on our porch. We practically live on our porch this time of year! If you'd like to make something really classy for display, you can try making terrariums in apothecary jars.


Fortunately, the shelf is tall enough keep them out of Violet's reach. :-)

This was a super fun outdoor activity that my kids absolutely loved, and I'll admit that I had a lot of fun with this one, too. Plus, it's super cheap if you just use plants from around your yard. Now, if only I could spruce up my real Mary garden....


Toldja I don't have a green thumb. ;-)
Plus, my poor Mary statue needs to be glued back together again. Again.

If you enjoyed this post, get free updates by email or RSS. Photobucket

How to Choose Flowers for Your Mary Garden

I always thought that Mary gardens were just a garden that included a Mary statue. (Although you don't even need a Mary statue- check out these ideas for making a statueless Mary garden). Beyond the statue, there are certain kinds of flowers that go into the gardens that symbolize different aspects of Mary! There are literally hundreds (depending on your climate zone, etc) but being a beginner myself, I've put together a "beginner's list" of symbolic flowers for your Mary garden.

Marigolds are a very popular choice because there are 
legends associated with marigolds adorning Mary's garments. 
It's also said that marigolds are named for the 
"Golden Virgin Mary".

Blue and white flowers are very popular choices 
for Mary gardens because those are her colors! :-)

Roses are other good choice. They are associated with the rosary,
and are often depicted with Mary in artwork.

Rosemary has a legend associated with Mary's flight to Egypt.
It is said that she stopped to rest under a rosemary bush and spread
her cloak on it to dry- Then the blossoms changed from white to blue!

Another popular choice- the Madonna Lily.
They symbolize purity and virginity.

Anne from Under her Starry Mantel has a beautiful post
on the different types of flowers that go into a Mary garden
and what they symbolize. Well done, Anne!

If you're still looking for more ideas, check this site
for more Marian flower symbols. Hapy Mary gardening! :-)

Related Posts:


If you enjoyed this post, get free updates by email or RSS. Photobucket

Have a Meaningful Easter Dinner with Resurrection Story Napkin Rings

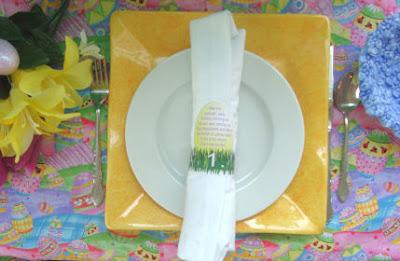
Did you know that to us Christians, Easter is more important that Christmas? It can be so hard to keep the day focused around the true meaning of Easter, but not impossible! I designed these resurrection printables to be used at Easter dinner as part of a religious place setting!


Each of these eggs has a piece of the resurrection story, and they're numbered. Basically, what you do is incorporate them into your table setting. After blessing your food around your Easter table, the resurrection story is read by everyone around the table! Just print them, cut them out, and tape them into a ring.

They can go around your napkins...

...or they can stand up on their own right on your Easter place settings!

I broke the resurrection story down into 8 reading parts. If you need to use more than one at each place setting, that's ok. If you have more than 8 guests for Easter dinner, I also included one matching sheet of blank eggs that you can use to fill in with. These can also be used for children who are too small to read, or as coordinating place cards. A few of the eggs have smaller reading parts- I did this so they could be used for new readers. :-) You're welcome to download these religious Easter dinner helpers for free:

Resurrection Story Napkin Rings:
Page 1
Page 2
Page 3
Extra Blank Eggs

*As always, download these before printing because Google docs can be weird sometimes and only want to print half the page. Also, these were designed by me for personal use only yada yada yada, so don't sell them or make me regret posting them on the internet for free, k? ;-) * 

If you'd like to make your own so you can have the right number for your guests, here's my printable resurrection story you can use as a jumping off place.

This is the first year we will be incorporating the resurrection story into our Easter dinner, and I'm really excited about it! I would like to do something similar for Christmas dinner. I truly hope these Easter napkin printables can help your family have a meaningful Easter dinner! If you're looking for more free Easter printables, be sure and check out my post from yesterday. :-)

Actually, find all my Easter posts (and great ideas from Catholic Icing readers) at my Easter Link up! Keep the links coming! :-)

If you enjoyed this post, get free updates by email or RSS. Photobucket

Meaningful Easter Activity for Kids - Empty Tomb Snack

I wanted to make a cute and religious Easter treat for my kids, but as most of ya'll know, I'm not much of a cook. Well, here's an idea for a sweet Easter treat that is no bake plus your kids can assemble them as a religious Easter activity!


Ingredients Needed for Empty Tomb Treats:
  • Graham Crackers
  • Peanut Butter (or icing if you have an alergy)
  • Small Chocolate Doughnuts
  • Mini Oreo Cookies
  • Shredded Coconut
  • Green Food Coloring

Prep the Snack:
Before you grab the kids for this Christian Easter activity, you might want to prep a few things. Take your shredded coconut and place it in a sandwich baggie. Drip a few drops of green food coloring in, and shake the bag until your coconut turns green. Also, cut off the bottom of your chocolate doughnuts.


Now you're ready for the fun to begin! Have your kids spread peanut butter on the graham cracker, and stick their doughnut "tomb" on. Then, take one mini oreo and twist it apart. Use the side with the icing on it to stick it to the front of the doughnut as the "rock" rolled away from the entrance of the tomb. Sprinkle some coconut "grass" onto the remainder of the peanut butter. 


We also made some Easter banners from the leftover Stations of the Cross stickers we got at the Dollar Tree. 

These we so easy to make, and came out cuter than I thought they would! Enjoy these Resurrection treats on Easter!


Don't forget to bring your Easter ideas to my Easter link-up!

If you enjoyed this post, get free updates by email or RSS. Photobucket

Craft an Easter Candle with Kids

Making an Easter candle (also known as a Paschal Candle) to use at home can be a great religious Easter tradition for your family! The ones we made were made were super easy to do, and I used candles from the Dollar Tree, so this project seriously only cost us $1.


These are so much easier to make than it first appears! 

  1. Scratch your design onto the candle with a dull pencil.
  2. Let you kids paint on it however they see fit.
  3. Wipe the candle with a baby wipe.
  4. Your design is complete! :-)
Easter candles can have all kinds of symbols. It seems they mostly commonly have a cross with the year written around it. We also have a Paschal lamb on the back of ours. Some other things you could try would be an alpha and omega, wheat and grapes... all kinds of stuff really!
 

Also, poke some holes in each end of the cross and one in the middle to insert cloves. I actually had real cloves this year, but last year I didn't so we just stuck in some grains of brown rice. The cloves are inserted like nails, and there are 5 of them to represent the 5 wounds of Christ.


I actually love the color variation this painting technique creates!

I was trying to come up with a religious Easter craft to use with my preschool class, and thought that making Paschal candles would be perfect! It went even better than I thought it would! I scratched the design into their candles ahead of time, poked the holes for the cloves, and they took it from there. (We used washable tempera paints).


 Didn't they come out nice? The kids in my class
are only 2 years old!

When to light your Easter Candle at home:
The Catholic church lights the Paschal candle through the whole season of Easter (so from Easter Sunday through Pentecost Sunday), and also at baptisms and funerals. We plan on lighting ours at dinner each night during the Easter season.- all 50 days! :-)

Don't Miss a Chance to Teach your Kids!
After making your Easter candle, take it to mass and have the priest bless it for you! Also, take them to the front of the church and show them the really big Easter candle there. Easter is almost here! :-)

Related Posts:


If you enjoyed this post, get free updates by email or RSS. Photobucket

Celebrating Easter with Hand painted Eggs and a Tree, by guest blogger Ingrid Lee.

I'm really happy to be writing and sharing my Easter themed artwork with you all again!  I had a lot of fun writing my last post here at Catholic Icing, about painting a Paschal candle and this time I've been invited to share my Easter Egg Tree. 

I didn't grow up celebrating Easter with an Easter egg tree, but because our family cultures are so diverse, I wanted to start creating traditions around our celebrations like Easter, which embrace those cultures and move it forward to a new generation.  Our family celebrates bits and pieces of traditions (especially baking!)  from a Russian Orthodox, and Catholic traditions from our Polish, German and Hungarian cultures, all mixed with an Australian flavor!

 
As children, we always painted our Easter eggs and cracked them in a game on Easter Sunday, and ate them with our lunch. Is this a tradition you practice? While Easter Eggs are traditionally connected with rebirth, rejuvenation and immortality, I thought I'd hand paint wooden eggs using traditional Easter motifs from our cultural background.  These eggs are display on our dinner table, so that over dinner we can talk to our children about Easter and traditions, and we can celebrate together, in a simple way, the coming Kingdom of God and Jesus’ love into our home. 


Initially my grand plan was to hand paint 40 eggs to represent the 40 days of Lent (I've still got six to go!).  And then, while researching designs for my eggs,  I also came across a fun idea of making an Easter Egg Tree.  This is a German tradition (which ticked a box!) where hollow eggs are hung on a “tree” made from spring branches like cherry blossoms.  Now, because it is Autumn in Australia during Lent, and we don't have pussy willows (a Polish Easter tradition) growing or cherry blossoms in bloom, I added synthetic branches to a vase, and then decorated it with my hand painted eggs.


This year I am going to adopt a new way of celebrating our Easter Tree, from an idea I found written by Rachel Keller.  Basically, two weeks before Easter Sunday, my children will place an Egg on the tree, and read out a verse from scripture which relates to that day.  Each egg has its own bag and verse written on a small strip of paper, which we will read and discuss together.  Depending on the age of the children you'll need to summarise it simply for them, but you get the idea!  I've included the list of days and verse from Rachel's website:

·    Day 1: Genesis 3:1-19 (God's first promise of sending a Redeemer)
·    Day 2: Genesis 22:1-14 (the story of Abraham and Isaac when God provides the ram for the offering)
·    Day 3: Exodus 12:21-30 (the first Passover)
·    Day 4: Numbers 21:4-9 (Moses and the brass serpent)
·    Day 5: Matthew 21:33-46 (parable of the unfaithful stewards)
·    Day 6: John 12:1-11 (Mary's anointing Jesus' feet with her hair)
·    Day 7: Matthew 21:1-11 (Jesus' triumphant entry--Palm Sunday)
·    Day 8: Matthew 26:14-30 (the Last Supper)
·    Day 9: Matthew 26:31-46 (the Garden of Gethsemane)
·    Day 10: Matthew 26:47-75 (Judas' betrayal)
·    Day 11: Matthew 27:11-31 (Jesus' trial before Pilate)
·    Day 12: Matthew 27:32-56 (the crucifixion)
·    Day 13: Matthew 27:57-66 (Jesus' burial)
·    Day 14: Matthew 28:1-10; Mark:16:1-20; Luke 24:1-49; John 20:1-31 (the resurrection)

Have you made an Easter tree with your family?  What did you do with yours?  Is this an activity you've tried with your family?

Ingrid Lee is an artist, writer and educator about finding and exploring everyday creativity through art, porcelain painting, baking, embroidery and sharing the artworks of other inspiring people. Join her creative and inspiring adventures at Ingrid Creates.

If you enjoyed this post, get free updates by email or RSS. Photobucket

Printable Easter Countdown Calendar

Did you know that there are 50 days in the Easter season? Not one, but 50! That's even more days than there are in lent! The Easter season begins with Easter Sunday, and ends with Pentecost. In order to help my kids and I remember that the Easter season is an ongoing thing, I made this religious Easter countdown calendar which starts on Easter Sunday, and ends on Pentecost Sunday.
 
The best part about this Easter countdown calendar is that it's printable, and free for all of you!


Make sure you allow the image to download completely before printing, otherwise it may result in a half printing job. I'm sorry, but I cannot troubleshoot your printer problems with you- thank you for understanding. If you're having trouble printing, try downloading them first rather than printing straight from the doc.

This Easter calendar doesn't include calendar dates, so it's good for every year! Some days I included when drawing this calendar are Divine Mercy Sunday (which Pope John Paul II instituted as the second Sunday of Easter), all 8 Sundays of Easter, Ascension Thursday, and Pentecost. This is a great tool for teaching your kids about the liturgical year, so I hope you find a use for it!

How to use this calendar:
I'm going to have my kids mark off each day with a sticker. (I think I have a bunch of small Easter stickers left over from an egg dying kit around here somewhere). Other options would be coloring one square each day, or marking them off with "x's". You could also laminate the calendar with contact paper, or put it in a Dollar Store frame and then mark off the days with a dry erase marker. I also though about decoupaging it to a cookie sheet, and moving a magnet one square each day. It's totally up to you.

I'm definitely using these as a religious Easter basket stuffer at my house, too! ;-)

Just for fun, I'm also offering the Easter calendar in color, and it's also free!


The colored Easter calendar is available on a brand new special page for those who are subscribers of Catholic Icing! If you've already made yourself a friend of Catholic Icing by subscribing, just look to the bottom of this post in your reader or email, and you'll find a link to the "Subscriber Bonus Page". If you'd like to print the colored Easter calendar for free, but are not yet a subscriber, no problem! Subscribe here, or by entering your email address into the box below. After entering your email address, an email will be rushed to your inbox with access to the Subscriber bonus page!

Enter your email address:


If you're looking for a countdown calendar that ends on Easter, you need to check out my printable Lenten calendar

If you're looking for more ideas on how to celebrate all 50 days of Easter, check out this post

These pages are my own artwork and are free for any not-for-profit use by individuals, families, or educational organizations. Copies may not be sold, reproduced for profit, or published by anyone but me. If you'd like to post this calendar for others to find, I would ask that you link to my post and rather than my individual downloads because their location may change. When printing or running copies, please do not remove my website from the bottom of the page. Thanks!
If you enjoyed this post, get free updates by email or RSS. Photobucket

First Communion Craft - Make a First Communion Banner

Either I was the last Catholic on the planet to hear of first communion banners, or some of you also aren't familiar with this popular first communion tradition. Some parishes have all of their first communicants make banners. If this is the case at your church, you'll need to check and see if there are "rules" you need to follow (for instance, they want everyone's banner to be the same size, etc.) The rest of you may feel free to fly by the seat of your pants! :-)


Believe it or not, it's pretty easy to make a first communion banner, and there is no need for sewing! If you're feeling like this might be too crafty for you- think again! I'm going to show you exactly how to make a first communion banner and I promise you it's not as hard as you think! ;-)

Materials Needed to Make a First Communion Banner:
  • Big piece of felt or other fabric for background (don't shy away from bright colors!)
  • Wooden dowel
  • String
  • Glue
  • Assorted colors of felt (the stiff kind works best)
  • Sharp Scissors
  • Glitter glue or Fabric paint and craft jewels (optional)

Start by having you child sketch out what they want their first communion banner to look like. Let them design the first communion banner themselves- it will be more special to them that way! Some different symbols you can suggest for their first communion banner could include a chalice, dove, host, monstrance, lamb, grapes, wheat, cross, angel, bible, Jesus fish, or even a rainbow. Don't forget to leave room for your name and possibly the date.


When they're ready, have them cut their symbol pieces out of felt. We found that the stiff felt was easier to work with than the floppy kind, and I love the felt with glitter! :-)


Have them keep arranging their pieces and designing their first communion banner until everything is where they want it. Then they can glue the pieces down. You can either make an attempt to cut the letters of your child's name out of felt, or you can look for pre-cut felt letters at your craft store. You can even buy iron-on letters. You could also just use your fabric paint to write on the name and date, which would be a lot easier than cutting the letters out.


Once the felt pieces are all down, your child can embellish their first communion banner with glitter glue and fabric paint or even fake jewels! The possibilities are endless, so be creative!


When your child is finished decorating the front of their banner, let it all dry before moving on. Now you need to be able to put the dowel through the back so it can hang up. Here's how we went about doing that- and yes- a picture is worth a thousand words.

We let it dry like this.
It worked really well!

Tie on your string to your dowel and you're all finished!
Now that wasn't so bad... was it? ;-)


What do you do with a first communion banner? Well, it's generally displayed at the first communion mass. Some churches hang them all up on strings, some hang them off the sides of the pews. After first communion, taking your child's picture with their adorable banner is a must!


When you get back home hang it up in their room as a memento of this important day! (By the way, this is my little brother. He is so proud of his banner!)

If you'd like to see more first communion banner examples, Angie at Many Little Blessings has a pictures of more than 40 child-made first communion banners. Of course, all inclusive first communion banner kits are available if that's more your speed, and some of them are quite striking when completed!
If you enjoyed this post, get free updates by email or RSS. Photobucket