Showing posts with label My Printables. Show all posts

New Mass Responses Booklet for Kids- Free to Print!

As I'm sure you all know, beginning on the first Sunday of Advent (2011) we will all begin using the third edition of the Roman Missal, so mass responses are going to change a little. Most of us are going to need to read along for awhile- let's face it- old habits die hard and many of us have been saying to same responses every Sunday for our entire lives. It's time to re-program our brains.

There are several printable resources of the new mass, but I couldn't find one that was just for kids... so I made one. :-)

This is not a complete child's new mass missal- it just has the parts of the mass that have changed, and it's based on cycle B since that's the year we're moving into.You're all welcome to print it for free!


This free, printable, new version of the mass for kids is available as a pdf. The pdf is 6 pages long, but the booklet is meant to be printed on 2 sides of the paper, so it's actually printed on just 3 sheets of paper. Here's how you print it:

Print page 1, then print page 2 on the back.
Print page 3, then print page 4 on the back.
Print page 5, then print page 6 on the back.

Once you have all 3 papers printed front and back, fold them in half. The individual half-pages have page numbers on them, so that will help you put them together in order. Crease the folds nicely, and staple together. That's it!


I really enjoyed putting this together, and I hope you find it useful! I know my children and I will enjoy using these instead of those pew cards. They're just a little more fun and child friendly. 


Don't forget to pass this post onto your friends,CCD teachers, and Catholic email lists! Thanks!


If you enjoyed this post, get free updates by email or RSS. Photobucket

Saintly Soda for All Saints' Day

I just got finished making some labels for the All Saints' Day party we're going to this weekend, and I wanted to share them with you! It's a knock off of Dr. Pepper. Check it out!

Dr. Gianna's Saintly Soda

Before I go on, I just wanted to check and make sure... you guys knew that Saint Gianna was a doctor, right? Good! Just wanted to be on the safe side and state the obvious there. :-)

I made 2 different label sizes. One label goes around a 2 liter bottle of soda.

The other set of labels prints 3 to a page, and they go around the small cans of Dr. Pepper. The size of cans I used were the 7.5 FL OZ, and I got them at Wegman's. These are smaller than standard coke cans, but pretty common to find.

You may as well buy off brand for the 2 liter bottle, because you're going to cover the label anyway, so who will ever know? I got "Dr. W's", also available at Wegman's. ;-)

I'm really excited about this "Saintly Soda"! I think it will be a hit at our All Saints' Day party because all of my friends really love Saint Gianna (including me). 


Just print the labels, cut, and tape them on.

I'm working on some more labels for Saintly food right now, so hopefully I'll post those for ya'll tomorrow. I'm so excited that All Saints' Day is almost here! :-) 

If you enjoyed this post, get free updates by email or RSS. Photobucket

Have a Meaningful Easter Dinner with Resurrection Story Napkin Rings

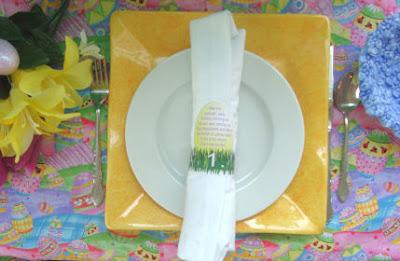
Did you know that to us Christians, Easter is more important that Christmas? It can be so hard to keep the day focused around the true meaning of Easter, but not impossible! I designed these resurrection printables to be used at Easter dinner as part of a religious place setting!


Each of these eggs has a piece of the resurrection story, and they're numbered. Basically, what you do is incorporate them into your table setting. After blessing your food around your Easter table, the resurrection story is read by everyone around the table! Just print them, cut them out, and tape them into a ring.

They can go around your napkins...

...or they can stand up on their own right on your Easter place settings!

I broke the resurrection story down into 8 reading parts. If you need to use more than one at each place setting, that's ok. If you have more than 8 guests for Easter dinner, I also included one matching sheet of blank eggs that you can use to fill in with. These can also be used for children who are too small to read, or as coordinating place cards. A few of the eggs have smaller reading parts- I did this so they could be used for new readers. :-) You're welcome to download these religious Easter dinner helpers for free:

Resurrection Story Napkin Rings:
Page 1
Page 2
Page 3
Extra Blank Eggs

*As always, download these before printing because Google docs can be weird sometimes and only want to print half the page. Also, these were designed by me for personal use only yada yada yada, so don't sell them or make me regret posting them on the internet for free, k? ;-) * 

If you'd like to make your own so you can have the right number for your guests, here's my printable resurrection story you can use as a jumping off place.

This is the first year we will be incorporating the resurrection story into our Easter dinner, and I'm really excited about it! I would like to do something similar for Christmas dinner. I truly hope these Easter napkin printables can help your family have a meaningful Easter dinner! If you're looking for more free Easter printables, be sure and check out my post from yesterday. :-)

Actually, find all my Easter posts (and great ideas from Catholic Icing readers) at my Easter Link up! Keep the links coming! :-)

If you enjoyed this post, get free updates by email or RSS. Photobucket

Religious Easter Craft for Kids -- Make a Resurrection Set! {It's Printable!}

I've been working on something that I've had in my head since last Easter, and I'm very excited to reveal it to you today- my new Printable Resurrection Set!


We all put nativity sets out at Christmas time, and I'm not sure why resurrection sets aren't more popular. So I made a printable version that's the counterpart to my printable nativity set.

What you need to make your own resurrection set:
  • 10 cardboard tissue tubes (or about 4 paper towel tubes, or like 1 wrapping paper tube)
  • 1 empty (square) tissue box
  • Glue or a stapler
  • Something to color them with (optional)
  • Resurrection Set Printables
  • Scissors
All you do is print the pages provided from this post, color them, cut them out, and glue them around toilet paper tubes.  The cutting is very easy... if you want it to be. For the most part, just cut around the outside lines. If you want something to stick out from the sides (like Jesus' arms or the angels' wings) you can cut them out around the edges and let them flap free from the sides of the tubes.


The tomb is cut out and glued to the top of a tissue box. This part could actually stand alone as an empty tomb craft for Easter. The rock and tomb print on the same page. I used a brad to attach our rock so that we can swing it open or closed. I found brads in the scrapbooking section of our craft store. Cut the hole out of the middle of the tomb and glue it over the open hole in your tissue box, and turn it on it's side. This makes a tomb you can actually place Jesus in.


The cross definitely needs to be cut free, so on that one I provided dotted lines to cut on.


On the cross page, I also provide a Jesus that can go on the cross. The way you use this is to have your children tape Jesus onto the cross on Good Friday at noon. Then at 3, take Him down, place his body in the tomb, and close the stone. On Easter morning, replace Jesus' body with the empty linen cloths. 

 
The linen cloths can just be folded to stand up and placed inside the tissue box.


I wanted my Resurrection Set to hold up a little longer than our nativity set did, so I painted them with watercolor paints, laminated them from the top with contact paper, and then cut them out. I didn't laminate them on the backs because they just glued around the cardboard tubes anyway. It would have been easier to attach them in the back with a stapler, but I couldn't find mine, so I used glue and held them in place with clothes pins until they dried. Now, here are the printables so you can make your own resurrection set!


Free Printable Resurrection Set 
in Black and White

My printable resurrection set includes Risen Jesus, St. Mary Magdalen, Mary the mother of John, St. Peter, 2 Angels, a Tomb with a rock, Linen cloths, 2 Roman soldiers, a Cross, and Crucified Jesus.


Use this set to teach your kids about the Resurrection
You can use this set as an interactive way to teach your kids the story of the Resurrection! If you'd like to use this as a religious Montessori activity for kids, I made a printable resurrection story for kids that you can use. Read the story aloud to your kids while you act it out with the pieces. I have included all the pieces you need for this biblical story. When you're done teaching with it, use it as a religious Easter mantle display! ;-)

You can also print this Resurrection set for free in Color! 


 I painted this Resurrection sets with watercolors, and scanned them again so I could offer them to all of you already in color as well! (It's pretty cute to have your kids color them, but sometimes it's nice to have this option as well.)

The colored set is available on my new special page for those who are subscribers of Catholic Icing! If you've already made yourself a friend of Catholic Icing by subscribing, just look to the bottom of this post in your reader or email, and you'll find a link to the "Subscriber Bonus Page". If you'd like to print the colored Resurrection set for free, but are not yet a subscriber, no problem! Subscribe here, or by entering your email address into the box below. After entering your email address, an email will be rushed to your inbox with access to the Subscriber bonus page!

Enter your email address:

These pages are my own artwork and are free for any not-for-profit use by individuals, families, or educational organizations. Copies may not be sold, reproduced for profit, or published by anyone but me. If you'd like to post this calendar for others to find, I would ask that you link to my post and rather than my individual downloads because their location may change. When printing or running copies, please do not remove my website from the bottom of the page. Thanks!

Linking this up at Tatertots and Jello and A Holy Experience.
 
If you enjoyed this post, get free updates by email or RSS. Photobucket

Printable Easter Countdown Calendar

Did you know that there are 50 days in the Easter season? Not one, but 50! That's even more days than there are in lent! The Easter season begins with Easter Sunday, and ends with Pentecost. In order to help my kids and I remember that the Easter season is an ongoing thing, I made this religious Easter countdown calendar which starts on Easter Sunday, and ends on Pentecost Sunday.
 
The best part about this Easter countdown calendar is that it's printable, and free for all of you!


Make sure you allow the image to download completely before printing, otherwise it may result in a half printing job. I'm sorry, but I cannot troubleshoot your printer problems with you- thank you for understanding. If you're having trouble printing, try downloading them first rather than printing straight from the doc.

This Easter calendar doesn't include calendar dates, so it's good for every year! Some days I included when drawing this calendar are Divine Mercy Sunday (which Pope John Paul II instituted as the second Sunday of Easter), all 8 Sundays of Easter, Ascension Thursday, and Pentecost. This is a great tool for teaching your kids about the liturgical year, so I hope you find a use for it!

How to use this calendar:
I'm going to have my kids mark off each day with a sticker. (I think I have a bunch of small Easter stickers left over from an egg dying kit around here somewhere). Other options would be coloring one square each day, or marking them off with "x's". You could also laminate the calendar with contact paper, or put it in a Dollar Store frame and then mark off the days with a dry erase marker. I also though about decoupaging it to a cookie sheet, and moving a magnet one square each day. It's totally up to you.

I'm definitely using these as a religious Easter basket stuffer at my house, too! ;-)

Just for fun, I'm also offering the Easter calendar in color, and it's also free!


The colored Easter calendar is available on a brand new special page for those who are subscribers of Catholic Icing! If you've already made yourself a friend of Catholic Icing by subscribing, just look to the bottom of this post in your reader or email, and you'll find a link to the "Subscriber Bonus Page". If you'd like to print the colored Easter calendar for free, but are not yet a subscriber, no problem! Subscribe here, or by entering your email address into the box below. After entering your email address, an email will be rushed to your inbox with access to the Subscriber bonus page!

Enter your email address:


If you're looking for a countdown calendar that ends on Easter, you need to check out my printable Lenten calendar

If you're looking for more ideas on how to celebrate all 50 days of Easter, check out this post

These pages are my own artwork and are free for any not-for-profit use by individuals, families, or educational organizations. Copies may not be sold, reproduced for profit, or published by anyone but me. If you'd like to post this calendar for others to find, I would ask that you link to my post and rather than my individual downloads because their location may change. When printing or running copies, please do not remove my website from the bottom of the page. Thanks!
If you enjoyed this post, get free updates by email or RSS. Photobucket

Printable Lenten Calendar for Kids

I made this printable Lenten calendar for children last year, but it's good for every year including 2011! It's free to print because I love to keep the resources free for all of my readers here at Catholic Icing!


If you'd like to use this for your kids this year to keep track of the days of lent, go ahead and print or save it to your computer- don't wait to do this on Mardi Gras. Last Fat Tuesday this calendar "exceeded reasonable bandwidth" and google docs stopped letting people view it. So lets try and spread it out a little more than that this year. :-)

Last year, my Lenten calendar was used for CCD classes, and in many homes! I loved some of the displays I saw. Check out this one from Lord, Make Me a Saint.

My Lenten calendar was actually translated into Italian last year! Isn't that so cool?! I love the internet! :-)

And my favorite way that I saw it used (and something I am definitely doing with my own children and my preschool class this year) is to put it in a lapbook like Homeschool Goodies! Check this out- very cool!

*UPDATE* One of my readers changed the Lenten calendar up a bit to work for the Byzantine Catholic church! Isn't that cool? You can visit her blog, The Whole Trouble Is for a printable Lenten calendar for Eastern Catholics. Also, Xhonane from Familia Catolica translated it into Spanish, so the Spanish Lenten Calendar is also available to print for free. How awesome is that?!

Let me know if you have another idea on how to use this free resource for Catholic kids! Enjoy! :-)

If you enjoyed this post, get free updates by email or RSS. Photobucket

Explain the Immaculate Conception to Kids

Catholic ABC's Week: 14 
Letter of the week: I
Theme: Immaculate Conception
Saint of the Week: St. Ignatius
Craft: Immaculate Conception Coloring Page


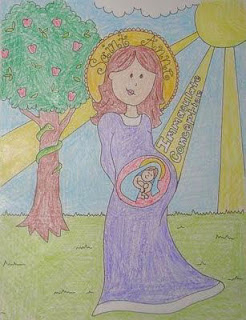
This Immaculate Conception coloring sheet was drawn by me last year. It is designed to help children (and all Catholics for that matter) understand that the Immaculate Conception refers to Mary being conceived without original sin; it is not referring to when Mary conceived Jesus.

Symbolism in this picture includes Mary in the womb of St. Anne (wearing her signature veil). St. Anne and Mary both have their backs turned towards the apple tree to visually state that Mary was conceived without original sin. There are 3 beams of light coming down from the sun that stand for the trinity. Also, the snake (Satan) is unhappy about what has happened here.

Grab Bag Ideas for the Letter Ii: (be sure to check out the Classroom Script for directions on using the grab bag.) Iguana, Igloo, Indy car, Ice cream cone, Indian corn, Inch worm, toy Iron, Invitation, Ivy, Island, Icon, Immaculate Heart, Insect, Instrument.

For More Resources, check out the Catholic Toolbox lesson plans for the Letter Ii. (Her Ii lesson is on Isaac!)

Catholic ABC's

Catholic ABC's runs here at Catholic Icing every Wednesday with the new letter of the week. You can get the details of this program by checking out the Classroom Script. We will be taking a few weeks off from this at Christmas. God bless!
If you enjoyed this post, get free updates by email or RSS. Photobucket

Divine Mercy Jesus Craft

Catholic ABC's Week: 9
Letter of the week: D
Theme: Divine Mercy Jesus
Saint of the Week: St. Denis
Craft: Divine Mercy Jesus Statue


This week we are learning about the letter "D" and Divine Mercy Jesus. Jesus appeared to St. Faustina, and asked her to have a painting made of this vision with the words "Jesus I Trust in You". The two rays represent Blood and Water. If you're curious, you can read more about the Divine Mercy Image.


Materials Needed To Complete This Craft:
Have your child color the Divine Mercy Jesus however he or she wishes, but encourage them to color the rays red and blue to stand for blood and water. Then cut the image out according to the directions on the printable. (Help your child to cut if needed). You then use a glue stick to attach your image around a toilet paper tube.

After the rays are colored red and blue, use a glue stick to cover them in red and blue glitter. We actually used red and silver glitter at my preschool co-op because these colors were available at the Dollar Tree so it was very affordable. And the silver worked great- it's supposed to stand for water after all :-)


Optionally, fold the rays back and forth like a fan before attaching with a glue stick.

Here is what my 2 year old preschool co-op class was capable of. I'll admit that this craft was a little complicated for them. But they loved the glitter!


And here's what my 4 year old was capable of. This was a perfect craft for her! I love how colorful her version is! I think he looks like "Our Divine Mercy of Guadalupe" - which is totally not a thing by the way. :-)


Your children can make their own little Divine Mercy Statue to leave in their bedroom! 

We really enjoyed this craft and I hope to make more of these available in the future. I've also been informed that this would be a great craft for the Little Flowers Mercy badge. Maybe some of you lead some groups that can use this idea!


Grab Bag Ideas for the Letter Dd: (be sure to check out the Classroom Script for directions on using the grab bag.) Dog, Dragon, Dinosaur, Dress, Doughnut, Dice, Doll, Dolphin, Duck, Dime, Dove.

For More Resources, check out the Catholic Toolbox lesson plans for the Letter Dd.

Catholic ABC's runs here at Catholic Icing every Wednesday with the new letter of the week. You can get the details of this program by checking out the Classroom Script.


Catholic ABC's

If you enjoyed this post, get free updates by email or RSS. Photobucket

Printable St. Gerard Note Cards

St. Gerard's feast day is on October 16, which is this Saturday. When I was in high school, I painted a whole series of Saint pictures that were supposed to "modernize" the saints. St. Gerard is the patron saint of expectant mothers and the unborn, so I did a mixed media piece of him in an ultrasound picture. I've always liked this piece a lot, and I like to have it hanging in our home- especially when I'm pregnant.
I thought this piece would make really nice Catholic note cards for expectant mothers. These could be great for telling anyone that you are praying for their unborn baby! I thought that these would be especially useful to send to someone having trouble with their pregnancy. Sometimes it's hard to find the right thing to send, but if you know a pregnant Catholic lady, you really can't go wrong with this one ;-) So I've made these simple printable note card for all of you to enjoy for free!


*Printing the Cards*
I've been having some emails about the cards not printing, but I just printed some from my computer as a test and it worked just fine. Click the link above the cards. On the google docs page there's a link in the top left corner that says 'print'. When it takes you to the printing screen use the little printer icon to the left of the picture. If you're still having problems shoot me an email and I'll send you the jpeg image for printing. :-)

I also think this could be a neat image for an NFP only OB/GYN to use in the office. I'm hoping to have some prints of these available in the future, so be sure and let me know in the comments if that's something you'd be interested in :-)

*If you're looking for a card to send to someone who has lost a baby, try This Printable Miscarriage Card from Vee at Paper Dali

The St. Gerard mixed media piece was completed using colored pencils, watercolor paint, and acrylic paint on watercolor paper. It's meant to be St. Gerard actually inside of an ultrasound picture, so that's why all the white dots and words etc. The baby in the ultrasound is actually my little brother. He was born when I was 16.

I hope you enjoy these note cards! As soon as I have some printer ink I am going to print them and send some out myself! Here I am with the original:


*These printable note cards are my own artwork and are free for any not-for-profit use by individuals, families, or educational organizations. Copies may not be sold or reproduced for profit. If you'd like to post these note cards for others to find, I would ask that you link to my post and rather than my individual download. When printing or running copies, please do not remove my site name from the page. Thanks!
If you enjoyed this post, get free updates by email or RSS. Photobucket

Good Shepherd Learning Activity and Craft

Today I'm posting an activity you can do with children to teach them the story of the Good Shepherd. After you have done it with them several times, they should be able to do it on their own as kind of a Catholic Montessori activity. My preschoolers love this! And the best part is- I'm going to provide you with the necessary printables and directions to make your own set!.


How to use  your Good Shepherd Set-The directions are below. What's in red you say to them, and what's in parenthesis you "act out" for them using the new Good Shepherd set you're going to craft yourself :-)
(Based on John 10 and Luke 15)

"This is the Good Shepherd, and these are his sheep" (hold up coordinating pieces and set them inside the fence as you talk) "The Good Shepherd always enters through the gate." (bring the shepherd in through the gate) "The sheep know his voice. He calls his own sheep by name, and leads them out" (Take out shepherd, and take out the sheep one at a time behind the shepherd. Have him call them by your kid's names. For example: "Come on Lydia!" (bring a sheep out) "Come along Julian!" (bring out the second sheep). "When he has brought out all his own, he goes before them, and his sheep follow him because they know his voice." (Walk the shepherd around to other side, and have the sheep follow him one at a time.) "A stranger they will not follow, but they will flee from him, for they do not know the voice of strangers." (Continue with the shepherd around with the sheep following, and have him bring them back inside the fence) "I am the Good Shepherd. I know my own, and my own know me." (hold up the Shepherd) "The Good Shepherd lays down his life for the sheep." (Lay the Shepherd on his side, using his body to close the fence and keep the sheep in- shown below) "I am the Good Shepherd. I know my sheep, and my sheep know me- Just as the Father know me and I know the Father- and I lay down my life for the sheep." (Now put one of the sheep outside the fence at the length of your arm) "And I have other sheep that are not of this fold; I must bring them also, and they will heed my voice. So there shall be one flock, one shepherd. If a shepherd has 100 sheep and one of them gets lost, will he leave the others and go in search of the lost one." (Have the shepherd go and find the lost sheep). "And when he has found it, he lays it on his shoulders rejoicing! And when he comes home, he says 'Rejoice with me because I have found my sheep which was lost' and all the sheep are filled with joy! They are all together again with the Good Shepherd." (Put them all back inside the fence along with the shepherd.)

 (Demonstration of the Good Shepherd "laying down his life" 
for his sheep. And yes, he was happy to pose like this for me.)

Then ask them questions about the story:
-"Who is this? What kind of animal does God say that we are like sometimes? Who's voice do the sheep listen to? Who's voice should we listen to? Who is our Good Shepherd?"

If you're following along with Catholic ABC's, the first quarter will concentrate on The Good Shepherd. I will be posting the preschool script and class layout tomorrow, which will include needing this set, or something similar.

How To Craft Your Own Good Shepherd Set- I designed these printable sheep and the shepherd for my printable nativity set. When you click on the links to the files below, download them before you print because otherwise they print the wrong size. Trust me on this.

Free Printables:


All you do is print, color, cut, and then glue them around toilet paper tubes with a glue stick. It's that easy! You can make as many sheep for your set as you want. I would say one for each child you're teaching, but you need at least 2. Now for making their little pasture with a fence.

Supplies Needed for Pasture:
  • Foam Board (from the Dollar Tree. $1)
  • Green Paper
  • Glue Stick 
  • Something for "hole poking" (I used a corn on the cob holder)
  • Pipe Cleaners (also from the Dollar Tree. $1)
  • School Glue 
  • Scissors

Make Your Pasture:
  1. Trace a circle onto your foam board and green paper using a mixing bowl, and cut them out. It will be easier to cut the foam board using a box cutter if you have one on hand.
  2. Glue the green paper circle onto your foam board circle with a glue stick.
  3. Poke holes around the outside edge of the "pasture" for the fence. Leave an opening for the sheep to come in and out. (see pictures below)
  4. Cut the pipe cleaners into thirds and insert them into the holes for the fence. You can put one drop of glue on each hole before inserting the pipe cleaner for a permanent hold.
When poking your holes and inserting your pipe cleaners, go all the way around the circle putting them side by side first, like this:

Then poke holes in between each section of fence and insert a second layer of pipe cleaners, so that the fence pieces appear to cross each other. Don't forget about leaving your opening!


Now you're ready to start teaching your kids about the Good Shepherd! Come back tomorrow to get the preschool script that coordinates with this set! I'm so excited about this preschool curriculum!


Hope your kids enjoy this set! Let me know if you make this, or better yet, send me pictures! Getting pictures is my favorite! :-)

If you enjoyed this post, get free updates by email or RSS. Photobucket